Machines - Robots - Automobiles - Energy - Never Ending Technology - Power - Go Green - Pumps - Compressors - Power Plant - CAD - Cooling Tower - Oil & Gas - Heat Exchangers - Interview - Mock campus - Ship - Materials ...
INSPECTION OF BOILER WATER HEADERS
Each handhole and handhole plate seat should be examined
for erosion, steam cutting, tool marks, and other damage that might permit
leakage. If the plate has leaked previously, it should be checked for trueness
and possible deformation. Seating surfaces and faces of handholes should be
examined for cracks. It may be necessary to use a hand mirror to inspect the
handhole seats.
The inside surface of the headers should be inspected for
corrosion and erosion. The location and amount of scale buildup should be
noted, and the tube ends should be checked for pits, scale, cutting or other
damage from tube cleaners, and deposit buildup. If there is considerable scale
or deposit buildup, the flow may be restricted to the point that tubes become
overheated because of insufficient circulation. Deposits and scale should be
removed with a scraper and the depth of coating determined. Lower waterwall
headers are particularly susceptible to heavy deposit buildup.
Downcomers and risers should also be inspected for this
type of deposit. Thickness readings of headers should be obtained periodically
by ultrasonic technique. The headers should be calipered whenever tubes are
removed.
External surfaces of headers should be examined either
directly or indirectly with mirrors, and particular attention should be paid to
the points where tubes enter the header for indications of leakage from the
tube roll. The header surfaces adjacent to tube rolls and handholes should be
inspected for cracks. If external inspection of headers reveals pitting,
thickness measurements should be made using ultrasonic techniques.
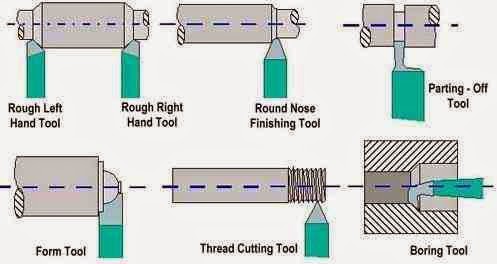
Types of Cutting Tool
Rough Left Hand Tool
Rough Right Hand Tool
Round Nose Finishing Tool
Parting - Off Tool
Form Tool
Thread Cutting Tool
Boring Tool

MAGNETIC TEST FOR CARBURIZATION
Austenitic
tubes are essentially nonmagnetic. Carburized areas of the tubes become
magnetic, and if these areas are large, they can be detected with a magnet. A
magnet on a string dropped down a tube will indicate areas that are magnetic
but will not indicate the depth of carburization. There are several
commercially available devices that are used for measuring the ferrite content
of austenitic welds which may be suitable for identifying loacilized areas of
magnetism in heater tubes. Some
instruments and field services can relate the degree of magnetism to the depth
of carburization. Most of the instruments are proprietary, and the field
services are limited.
A rule of thumb states that up to 50% carburization can
be tolerated on stream before loss of strength materially affects tube life.
Although this rule of thumb indicates that a tube with 50% carburization should
be replaced, it does not mean that less than 50% carburization will allow the
tube to remain in service until the next shutdown. Factors including the rate
of carburization, the expected service time until the next shutdown, the amount
of excess metal, and changes in pressure and temperature must be taken into
account.
PIT DEPTH MEASUREMENTS
General pitting of the external tube surface should be
evaluated with a pit depth gauge to assess the depth and to estimate a pitting
rate. The gauge should be used in conjunction with an ultrasonic thickness
gauge to more accurately determine remaining wall thickness. Scale on the tubes
will mask pits and so it is prudent to remove scale in selected areas to find
the deterioration.
Subscribe to:
Posts (Atom)


